Running a creative wedding business is equal parts art and logistics — and if you’re anything like most of the creatives I’ve worked with, the art part comes pretty easily. It’s the behind the scenes (the emails, the scheduling, the client workflows) that starts to feel a little messy and overwhelming.
That’s where HoneyBook comes in.
I’ve used HoneyBook since the very first month of launching my studio back in 2020, and it’s still the client management platform I recommend most often. From wedding photographers to planners and beyond, nearly every creative I’ve worked with has fallen in love with how seamlessly it supports their process — from inquiry to final delivery.
Before launching my template shop, I designed custom brands and Showit websites for wedding creatives — and naturally, that work expanded beyond just the visual. I found myself helping clients simplify their backend, clean up their systems, and design more aligned workflows. That’s what eventually led me to become a HoneyBook Design Partner — and now, those templates live in the hands of creatives all over the world.
Whether you’re brand new to HoneyBook or have been using it for years, this guide will walk you through the features I recommend the most — and show you how to bring more clarity, confidence, and beauty into your client’s experience.
So, let’s dive in.
Heads up: This post contains affiliate links, which means I may earn a small commission if you choose to sign up for HoneyBook through my link — at no extra cost to you. I only recommend tools I genuinely love, and HoneyBook has been one of them since day one.

But first, what is Honeybook?
HoneyBook is an all-in-one client management platform made for creative service-based businesses. It helps you manage your client journey from start to finish — with tools for contact forms, scheduling, email templates, proposals, contracts, payments, and more.
In short: it keeps your business running smoothly behind the scenes so you can focus on the work you actually love. And the best part? It’s designed with creative entrepreneurs in mind — meaning it’s both powerful and beautifully intuitive.
And if you’re new to HoneyBook, here’s a code to give you 30% off your first year.
How to Set Up HoneyBook with Ease
1. Choose the HoneyBook Plan That Matches Your Business
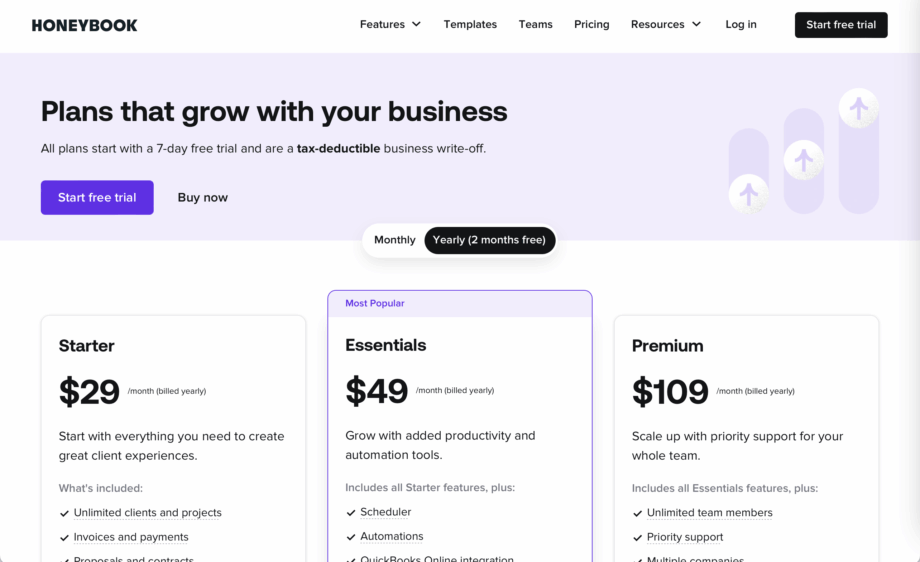
HoneyBook offers three plans. Each one offers a range of features and supports a different stage of growth. For 30% off your first year, here is my affiliate link. I recommend investing in an annual plan for additional savings.
Starter ($29/month, billed annually)
Best for new wedding creatives or those booking a few events a season. You’ll get:
- Unlimited projects + client files
- Simple invoices, contracts, and payments
- Calendar sync
- Basic reports + one branded contact form
💭 A sweet spot if you’re just beginning and want to stay grounded in the essentials.
Essentials ($49/month, billed annually)
For creatives booking consistently, growing a team, or craving automation. You’ll get everything in Starter, plus:
- Smart automation tools (yes please)
- HoneyBook Scheduler (no more back-and-forth emails)
- 2 team members
- QuickBooks integration
- Removal of “Powered by HoneyBook” branding
💭 This is the plan I recommend most often—it gives you room to breathe, create, and scale without feeling overwhelmed.
Premium ($109/month, billed annually)
For established teams or multi-brand studios. Adds:
- Unlimited team seats
- Priority support
- Multi-company support
- Advanced reporting
💭 Perfect if you’re managing multiple offerings or need deeper data to guide your next chapter.
💡 Tip: You can always start with Essentials and upgrade later as you expand.
2. Customize Your Brand & Business Details on Honeybook
The first thing you’ll want to do as a new Honeybook user is to set up the foundations so you can move forward as smoothly as possible. And even if you’ve been using Honeybook for awhile, these pieces could likely use a refresh.
1. Add Company Settings
Navigate to Settings > Company Settings. Make sure your brand name, business email, website, phone number, company address (bottom of page), and company type are all added and accurate. Ensuring these details are correct before sharing any contracts, smart files, and emails will save you a headache in the future.
Scroll down to “About Your Company” and take a moment to add some content about your business, including your brand tagline and about statement. Next, add any relevant social media links.
2. Add Brand Elements
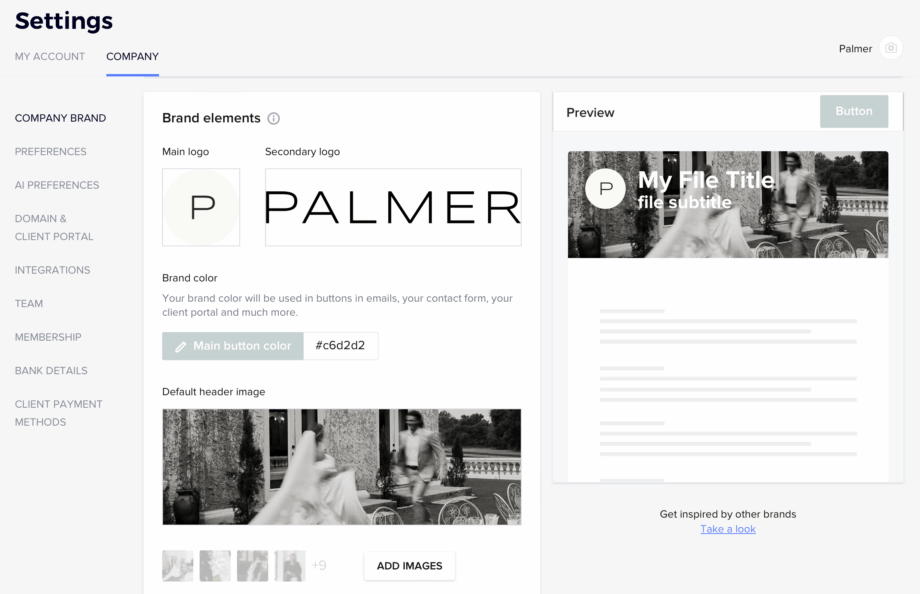
Next, you’ll want to upload your custom logos, fonts, and colors and customize your Company smart file theme. Your main logo will crop to a square, so I recommend adding a transparent-background PNG of a brand icon, monogram, or circle logo. Note that this logo will overlap your photo background in a client project workspace, so consider white or light brand color. Your secondary logo is the perfect place for your primary or wordmark logo.
Next, add one of your brand’s accent colors for your main buttons. Then, upload a photo in the Default Header Image section. A beautiful example of your work or a favorite image from your brand photoshoot is always a great idea.
3. Customize Company Smart File Theme
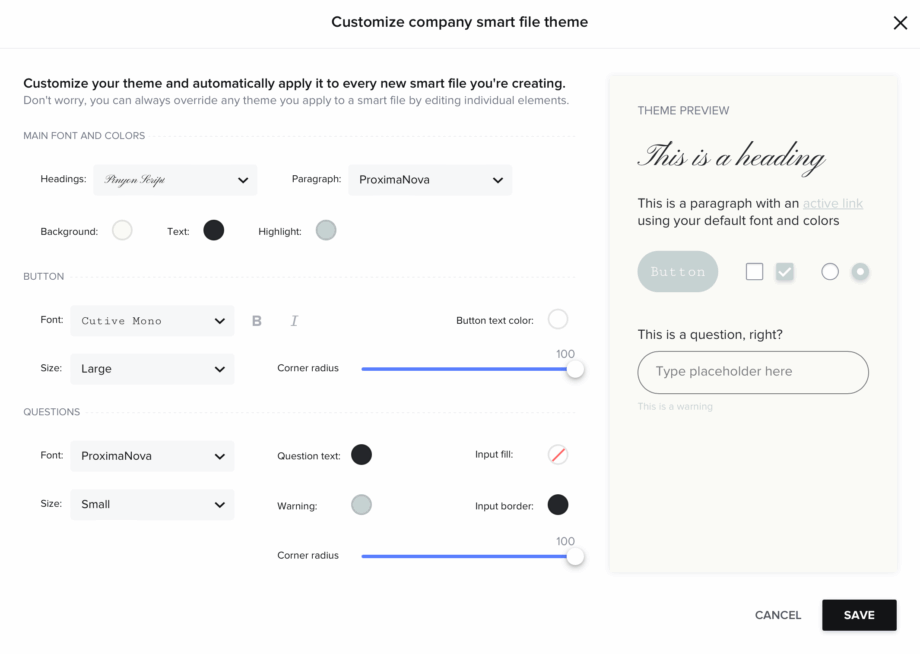
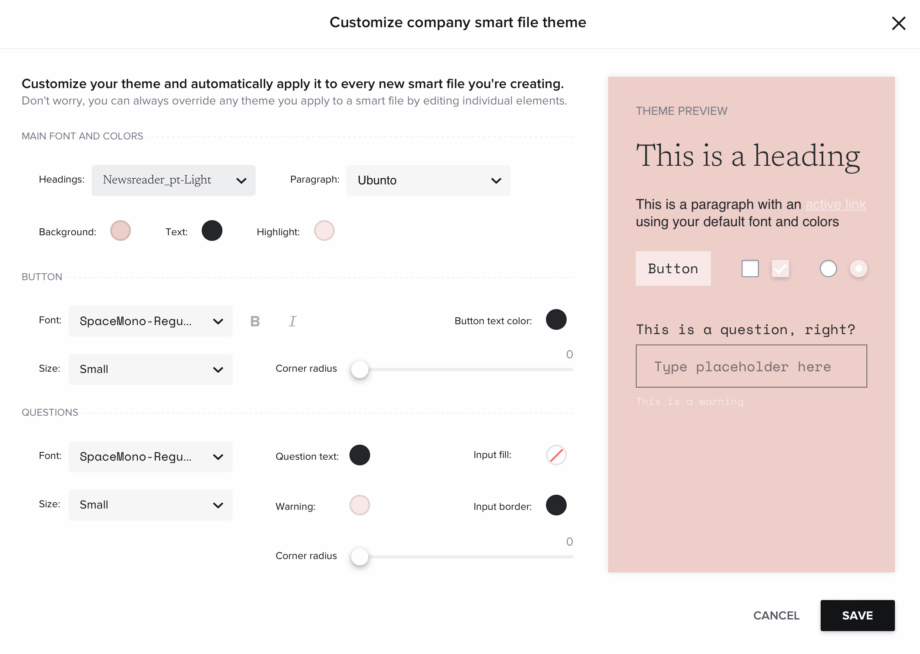
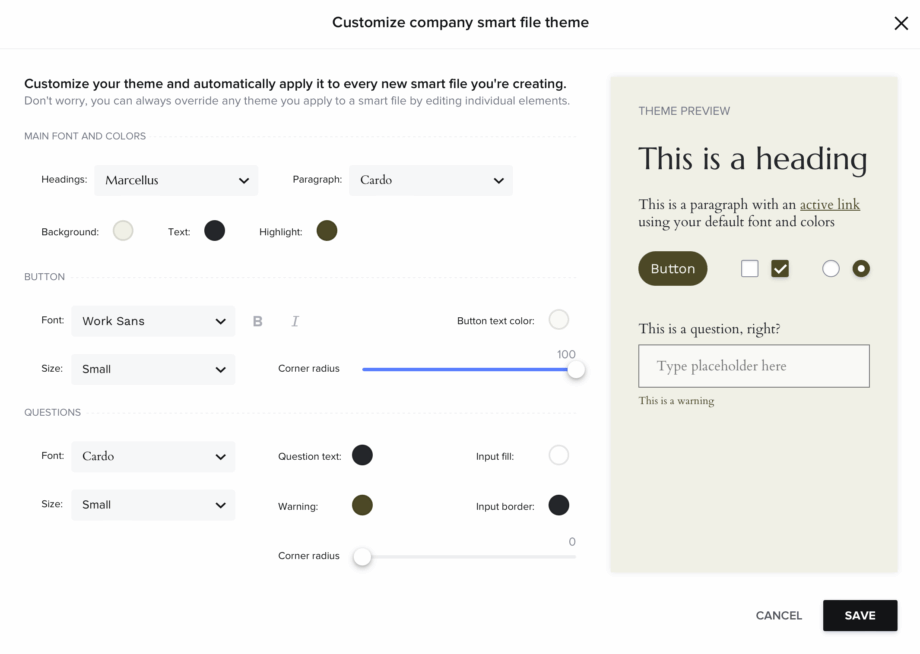
Next, open the smart file theme editor to add your custom brand fonts and set your brand colors. As the name implies, this will become the default theme that will be used in your custom smart files. This not only saves you time while customizing files, but also ensures brand consistency throughout your client experience. In other words, with just a few clicks, you can turn any Honeybook template into a custom branded file.
Play around with the various settings, like corner radiuses, background colors, and borders, to create a theme that reflects your brand identity. Below are a few examples of how just a few changes can completely change the feel of each theme.
4. Customize Email Signature
Last but not least, take a moment to customize your email signature. This signature will be available in email templates and the email thread inside your project workspaces. I recommend adding a logo or profile photo and any important links you may want your client to have access to. For the most beautiful result, I like to hyperlink the details, use spacers such as | or /, and customize with a brand color. Keep in mind that this signature cannot be edited within an email.

5. Explore Other Backend Settings
Before moving into smart files and automations, I recommend taking time to explore the backend of Company Settings to make sure all the important settings are addressed. You will want to connect your bank account for payments, sync your calendar, customize your client portal, and more.
3. Set up Your Scheduler in HoneyBook
Ever find yourself stuck in the “What time works for you?” email loop? The HoneyBook Scheduler is here to gently end that cycle.
This tool lets clients book a time based on your availability — no back and forth emails, no calendar juggling. You choose the type of session, set the days and times you’re available, and HoneyBook takes care of the rest.
Here’s what I recommend to get started:
- Create a “Discovery Call” session (30 minutes is perfect for most creatives)
- Choose how you want to meet — phone or video (connect Google Calendar or Zoom)
- Add buffer time before and after so you’re not rushing between meetings
- Copy your scheduler link and embed it in your Investment Guide, Contact Form, and follow-up emails
💡 Tip: I recommend creating as many sessions as your process needs, like “Onboarding Call” or “Design Presentation” or “Final Walkthrough”. Not only does this allow you to have different availability depending on the session, but will be extremely helpful in creating automations later on.
4. Create a Contact Form for Easy Inquiry on Honeybook
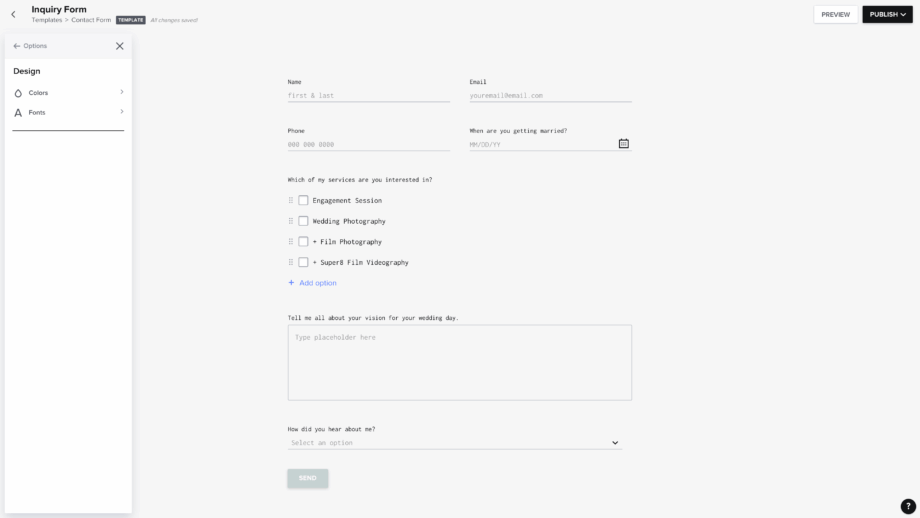
Once the basics of your backend are set up, it’s time to create your foundational client touch points starting with your contact form. Your contact form is the very first step in your client’s experience. It’s where someone’s curiosity turns into inquiry. Where a browser becomes a potential booking.
Of course, you’ll want to be sure you are asking the must-know questions that are unique to you and your business. Additionally, your contact form is an amazing opportunity to embody your brand tone.
1. Start with the basics
At the very least, every contact form should require your inquiry’s full name, email address, and a space to share a message. Depending on what you offer, you may want to ask questions like:
- Phone Number
- Address
- Instagram Handle
- Partner’s Name
- Partner’s Email Address
- What is your wedding date?
- Is your wedding date set or flexible?
- Where are you getting married?
- What package are you interested in? (Multiple Choice)
- Why do you want to work with me? What about my work inspires you?
- What is your budget?
- Tell me all about your vision for your wedding day.
- How did you find Business Name?
Some foundational questions — like name, email, address, project type, and lead source — can be connected and saved within the client’s contact information.
If you have questions that feel important to know, this is the time to ask. Remember, your systems are here to serve you! So don’t be shy about customizing things to fit your needs. That being said, keep things polished and professional. Keep the fluffy questions (like what’s your coffee order? what’s your favorite song?) to a minimum. There will be time to get more personal later on.
2. Add Your Brand Voice
That being said, I do encourage you to use this first touch point as an opportunity to show up in your brand. Keep things professional, but get creative with wording, punctuation, and design. Explore various question formats, double columns, and editing the placeholder text. These details may seem small and insignificant, but in my opinion, they are the little ways that set an embodied brand apart.
For example, here are two ways to word the same basic questions:
- What is your name? first + last
- Where can I reach you? email address
- When are you saying “I do”?
- Where are you getting married? venue, city, state, country
- Tell me a bit about you and your love…
- Tell me all about the wedding vision…
- Lastly, what about my work drew you in?
- NAME /
- EMAIL /
- WEDDING DATE /
- WEDDING LOCATION /
- YOUR STORY /
- YOUR VISION /
- LEAD SOURCE /
3. Polish the Design
Once you’ve added your questions, it’s time to customize the design to best match your brand. Navigate from Options > Design > Colors. I first recommend opening background color and sliding the transparency scale to 0%. You may also choose to add your website background color, but I prefer having a fully transparent background. Next, add your brand colors just like with the smart file editor.
Navigate back to Design > Fonts. At this time, Honeybook does not support custom fonts within forms. Browse the options and select one as similar to your brand fonts as possible. My favorites include Proxima Nova, Cutive Mono, and Cormorant Garamond. I always set both sizes to small and may unbold the button depending on the font.

4. Optional: Add a Scheduler
Depending on your process, you may choose to link your scheduler as a Custom URL under Options > Settings. This will open your scheduler immediately upon submission for your inquiring client to schedule a discovery call. In my experience, this step can greatly improve your chances of your inquiring client booking a call, since you are capitalizing on their momentum of their inquiry. Of course, for some creatives, you’ll need to check your availability before moving forward to an inquiry call. So use at your own discretion.
5. Embed it beautifully on your site
Once your form is looking beautiful and has all the questions needed for your inquiries, you’ll want to embed the form directly onto your website, assuming you have one. For creatives who do not yet have a website, you can also link this page directly in your bio for inquiries. To embed, simply click Publish in the top right corner and copy the code. This code will be pasted into an embed code on your website platform. For Showit users, here is a tutorial on how to do this. Be sure to size the code block as needed, on both mobile and desktop.
✨ Pro Tip: For Showit users, be sure to set the Canvas type of your embedded form to “Grow With Canvas”. This ensures that if you ever add questions to your contact form, your website canvas will flex to the new size without you having to come in and edit.
5. Set Up Your First Automation on HoneyBook
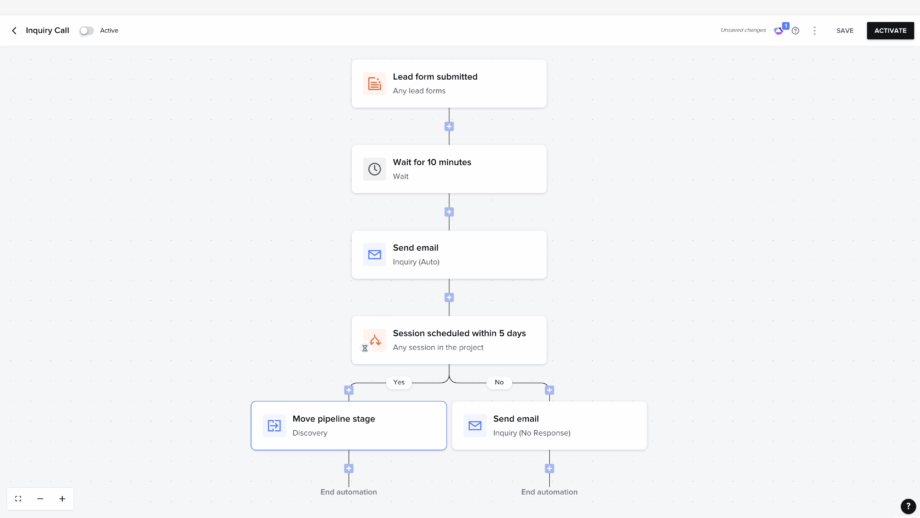
One of the most powerful (and freeing!) parts of HoneyBook is it’s automation feature. Think: emails sending and creating connection even when you’re offline. Think: onboarding your just-signed-on clients without lifting a finger. Think: followups and check ins that you don’t have to manage. I could go on.
The first automation I recommend to every wedding creative:
Trigger: Inquiry received
Action: Send a welcome email + link to your Investment Guide
Here’s a sample message:
“Hi [First Name],
Thank you so much for inquiring with me — I’m so honored to be considered for your big day! I’ll be reviewing your inquiry shortly and will be sure to get back to you within the next 1-2 business days. In the meantime, I invite you to browse my services, approach, and process via my Investment Guide here. Once I’ve checked my availability, I will be in touch with a booking link where you can schedule our discovery call where we’ll be able to get to know one another and see if we are a good fit! Thank you so much, I can’t wait to chat soon!”
Paired with a beautiful PDF investment guide or Honeybook smart file pricing guide, this one email can turn passive interest into intentional momentum.
Add a gentle reminder
Once you have gotten back to your inquiry with your availability, if the client hasn’t booked a call within a few days, you can also automate a follow-up email that says something like:
“Hi again! I recently received your inquiry (which got me SO excited), but I noticed you have not scheduled a discovery call with me yet! I’d love to learn more about your wedding day and see if we are aligned! Here is that link again! Let me know if you have any questions for me in the meantime!”
💡 Tip: HoneyBook does have a setting within automations that requires your approval before sending an email or file. So even while the process is “automated”, you can still control each step as you wish!
6. Use Smart Files to Create a HoneyBook Proposals
You’ve met with your client for your discovery call, whether it was a 15 minute phone call or an hour long Zoom. Now, it’s time to send a proposal that keeps those good feelings going and shows your client that you are the best choice for them.
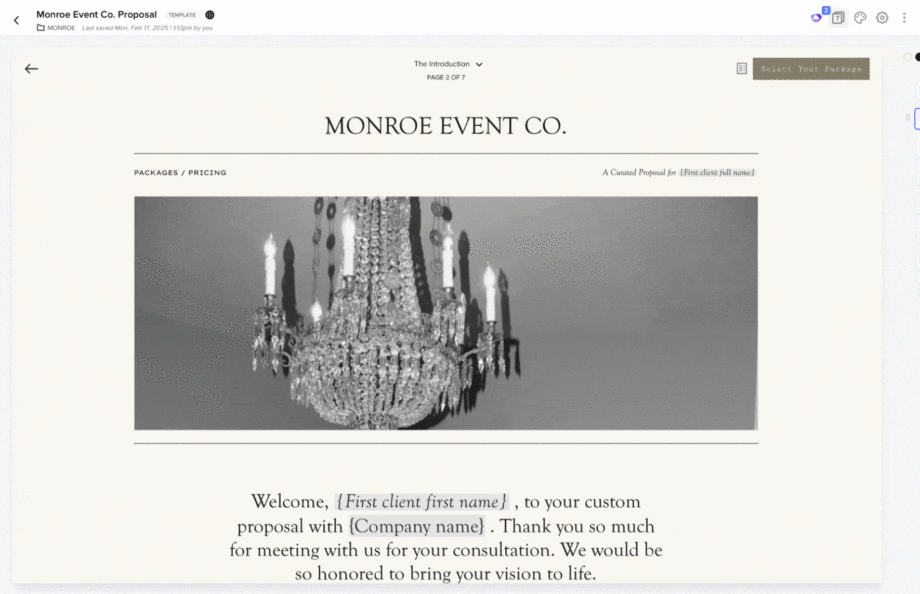
In HoneyBook, Smart Files allow you to combine multiple action steps, such as services selection, contract, invoice, and initial deposit, into one polished, interactive experience.
What to include:
- A short intro note welcoming them into this experience
- A pre-outlined package or customizable service options
- Your terms and contract (written clearly and with warmth)
- Payment schedule with clear due dates — or the option to choose a monthly plan
Your proposal doesn’t have to feel like a pitch. It can feel like an extension of your brand – calm, clear, and rooted in trust. The kind that invites your client in and helps them say yes with confidence.
📦 If you’re looking for a place to begin, I’ve created a variety of proposal templates designed to hold your offerings beautifully — no overwhelm, no starting from scratch. Just thoughtful structure, elevated design, and space for your work to speak for itself.
7. Use Smart Files to Create a Honeybook Questionnaire
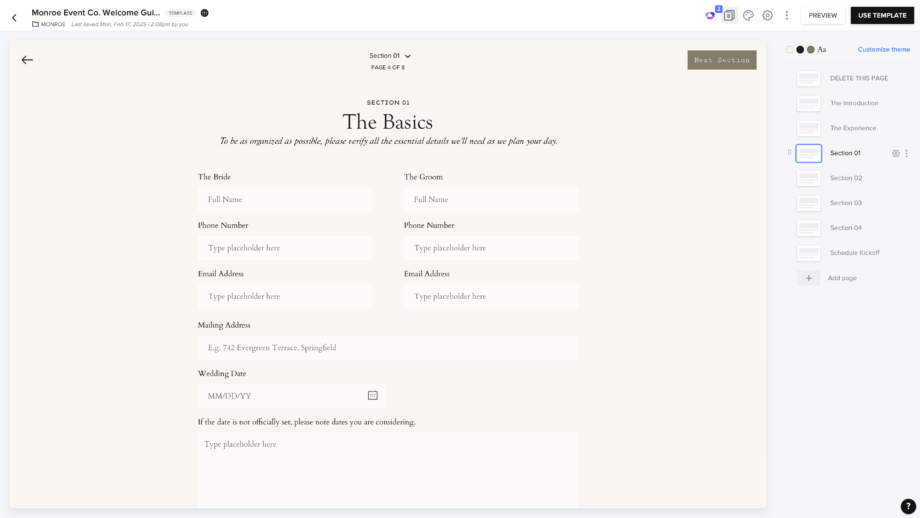
Within your client’s experience, you’ll likely need to go a bit deeper. I always recommend an onboarding questionnaire to set the tone for the support you’ll be providing your client. And as your client’s wedding day approaches, you’ll need final confirmations. Vendor details, timelines, addresses, contact info—tiny puzzle pieces that complete the picture.
With HoneyBook Smart Files, you can create immersive questionnaires to gather all of these little details in one beautiful file.
Use a questionnaire to ask:
- How did you and your partner meet?
- What is your proposal story?
- Do you have a Pinterest inspiration board?
- What time does your hair and makeup start?
- Who’s the point of contact on wedding day?
- Are there any non-negotiable moments that must be documented?
- Are you doing a first look?
- Names and numbers for vendors, family members, bridal party, etc.
✨ Pro Tip: Automate this form to send 4–6 weeks before the event date. This gives everyone time to breathe and plan accordingly.
Want to take it a step further? Schedule an internal reminder to email your team or assistant with a finalized logistics summary. HoneyBook makes that easy too.
📦 Need a place to start? My Monroe Event Co. Final Details Questionnaire is especially designed for wedding planners and coordinators.

A Final Reflection
As I like to say, a business is only as intentional as its founder. And with a highly supportive tool like Honeybook, this intentionality can feel effortless. When your systems support your rhythm — when they move with you instead of against you — you have more space to create, connect, and grow.
HoneyBook isn’t just a tool. In the hands of an intentional creative, it’s a foundation.
And if you’re looking for done-for-you templates that already reflect your process and your style, come explore my full collection — built intentionally for wedding creatives, and used by hundreds just like you.
✨ Browse Studio Gail’s HoneyBook Templates →
✨ Get 30% Off Your First Year with Honeybook (7 Day Free Trial Available) →
And if you ever want to chat it through, I’m here for you.
How to Use HoneyBook as A Wedding Photographer
files:
